Final Cut Pro User Guide
- Welcome
-
- What’s new in Final Cut Pro 10.5
- What’s new in Final Cut Pro 10.4.9
- What’s new in Final Cut Pro 10.4.7
- What’s new in Final Cut Pro 10.4.6
- What’s new in Final Cut Pro 10.4.4
- What’s new in Final Cut Pro 10.4.1
- What’s new in Final Cut Pro 10.4
- What’s new in Final Cut Pro 10.3
- What’s new in Final Cut Pro 10.2
- What’s new in Final Cut Pro 10.1.2
- What’s new in Final Cut Pro 10.1
- What’s new in Final Cut Pro 10.0.6
- What’s new in Final Cut Pro 10.0.3
- What’s new in Final Cut Pro 10.0.1
-
- Intro to effects
-
- Intro to transitions
- How transitions are created
- Add transitions
- Set the default transition
- Delete transitions
- Adjust transitions in the timeline
- Adjust transitions in the inspector and viewer
- Merge jump cuts with the Flow transition
- Adjust transitions with multiple images
- Modify transitions in Motion
-
- Add storylines
- Use the precision editor
- Conform frame sizes and rates
- Use XML to transfer projects
-
- Glossary
- Copyright

Create a new project in Final Cut Pro
To create a movie in Final Cut Pro, you first create a project, which provides a record of your editing decisions and the media you use.
When you create a new Final Cut Pro project, you do the following:
Name the project.
Specify the event where the project is stored.
Often, you store projects in events that contain the media used to create the project. When you drag media into the timeline from the Finder, or when you access media in the Photos and Audio sidebar and drag it to the timeline, that media is automatically located in the same event as the project.
Optionally, you can also set the starting timecode and define the video, audio, and render properties for the project.
After creating your project, you add clips to it from an event in the library.
Note: If you’re creating a project and you haven’t yet imported media into Final Cut Pro, you should do so. See Intro to importing media in Final Cut Pro.
In the Libraries sidebar in Final Cut Pro, select the event in which you want to create the project.
Choose File > New > Project (or press Command-N).
Tip: You can automatically create a project that has the video properties of a specific clip, without having to enter the project settings manually. In the browser, Control-click a clip and choose New Project, then enter a project name and click OK.
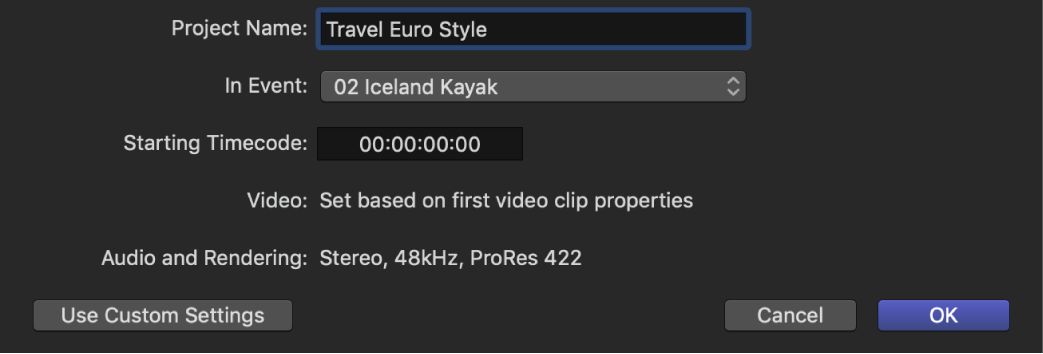
In the window that appears, type a name for the project in the Name field.
If you want to store the project in an event other than the selected event, click the In Event pop-up menu and choose a different event.
If you want your project’s timecode to start at a value other than 00:00:00:00, type a starting timecode value in the Starting Timecode field.
Note: If the automatic settings are shown, you can click OK to create a new project at this point. You can add a clip to the new (empty) project timeline, and, if the clip properties match a built-in preset, Final Cut Pro sets the project properties to match the properties of the clip.

If you want to further customize settings for your project, click Use Custom Settings.
Note: Final Cut Pro shows the automatic settings by default, but it retains the settings you used last, so this step may be unnecessary.
If you want to make any changes to the project’s video or audio properties, use the pop-up menus in the custom settings view.
Click OK.
The new project appears in the browser with the name you gave it in step 4.
You can now add clips from the browser and begin to edit your project in other ways, adding titles, special effects, background music, sound effects, and more.
You can change a project’s properties at any time. See Modify a project’s settings in Final Cut Pro.