
Build an iTunes Store package in Compressor
You can use Compressor to assemble your media and supplemental materials into an iTunes Store package. After creating the package, you can work with a delivery partner to submit it to the iTunes Store. During submission, the delivery partner includes additional required metadata and other materials to ensure your package is complete. The delivery partner can also provide billing and support services after your video becomes available for sale.
For more details about the entire creation and submission process, see iTunes Connect Resources and Help and Apple TV for Partners.
Create an iTunes Store package
In Compressor, choose File > New iTunes Store Package.
An iTunes Store package job appears in the batch area.
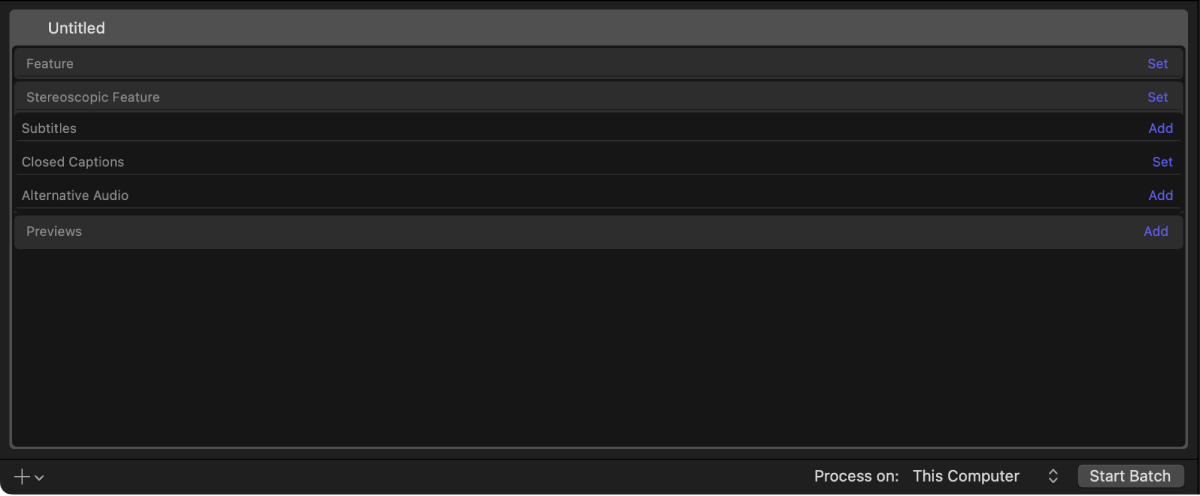
To add the primary video of your submission, click Set on the right side of the Feature row, select a video file from the dialog that appears, then click Open.
Tip: You can also add your video by dragging it from the Finder onto the Feature row.
An output row containing the selected video file is added to the job.
To configure the job properties of your iTunes Store package, select the feature filename to reveal the Job inspector, then set the file’s language and country, and optionally make adjustments to the timecode, color space, and burned-in text.
To modify video or audio properties of the primary video, select the feature filename, open the Video or Audio inspector, then adjust the property values.
Important: The iTunes Store requires specific video and audio presets in your package submission. Unless you know exactly what presets to change and why, it’s not advisable to make changes to the video or audio properties of the Feature or Preview items in your iTunes Store Package job.
To add supplemental files like subtitles, closed captions, or alternative audio, click Add or Set on the right side of the corresponding row, select a file from the dialog that appears, then click Open.
Tip: You can also add supplemental files by dragging them from the Finder onto the Subtitles, Closed Captions, or Alternative Audio row.
You can add multiple files in each category (for example, to include subtitles or closed captions for multiple languages). A supplemental file row is created for each file you add.
Important: Subtitle files must be iTT (iTunes Timed Text) subtitles, and closed-caption files must be CEA-608 closed captions.
By default, the primary audio track of an iTunes Store package is audio included with the main feature. To choose different a primary audio track for your package, select
 in the center of the corresponding Alternative Audio row. The speaker button of the primary audio track turns blue and adds a checkmark:
  .
.To reselect the audio track from the main feature as the primary audio, select
in the feature row.To add a short preview video, click Add on the right side of the Previews row, select a video file from the dialog that appears, then click Open.
Tip: You can also add a preview video by dragging it from the Finder onto the Previews row.
Compressor adds a row containing the selected video file to the job. You can adjust its properties by selecting the preview video filename, then making changes in the inspector.
For more information on creating iTunes Store packages with HDR or stereoscopic footage, see Build an iTunes Store package with HDR content in Compressor and Build an iTunes Store package with stereo-3D content in Compressor.
Configure subtitles, closed captions, and alternative audio tracks
After you add subtitles, closed captions, or alternative audio tracks to a job, you must configure those elements to ensure that they’re labeled with the correct language and other settings.
In the Compressor batch area, select a row under the Subtitles heading to reveal the Subtitles inspector.
In the Subtitles inspector, choose options from the Language pop-up menu, the Country pop-up menu, and the Purpose pop-up menu.
There are three available options in the Purpose pop-up menu:
Translation (Full): Outputs a full translation of all words spoken in the film using the language of the intended territory. During playback, viewers can turn these subtitles on or off (unlike burned-in subtitles).
Forced: Use when a person in the video speaks a language different from the main language of the video—for example, for a French speaker in an otherwise English-language film. Forced subtitles can’t be turned off because they’re necessary to understand the content of the video.
Deaf and Hard of Hearing (SDH): Use for a full translation of all the words spoken in the video, as well as song lyrics and sound effects (owl hooting, scream in distance, and so on). During playback, viewers can turn subtitles for the deaf or hard of hearing (SDH) on or off.
Tip: In the Subtitles inspector, you can also edit subtitle text, color, and placement and adjust subtitle timing.
In the batch area, select a row under the Closed Captions heading to reveal the Closed Captions inspector.
In the Closed Captions inspector, choose options from the Language pop-up menu and the Country pop-up menu.
Tip: In the Closed Captions inspector, you can also edit subtitle text, color, animation, and placement and adjust subtitle timing.
In the batch area, select a row under the Alternative Audio heading to reveal the Alternative Audio inspector.
In the Job pane of the Alternative Audio inspector, do the following:
Choose options from the Language pop-up menu and Country pop-up menu.
If the alternative audio track is descriptive audio, select the “Descriptive audio” checkbox (in the Alternative Audio Properties area).
You can add multiple descriptive audio tracks (for example, in multiple languages).
If you want the alternative audio track to be the primary audio for the package, select
in the corresponding row. When an alternative audio track is selected as the primary audio track, it’s locked to the language of the feature video.Note: An alternative audio track can’t be selected as both descriptive audio and the primary audio track. Selecting the “Descriptive audio” checkbox will automatically deselect the track as primary audio.
If your alternative audio track is a Dolby Atmos track, you can select downmixing options. The “Downmix to Stereo” checkbox is selected by default, but you can select the “Downmix to 7.1” or “Downmix to 5.1” checkboxes if you want the iTunes Store to downmix in those formats as well.
Important: For a Dolby Atmos track to be the primary audio for the package, “Downmix to Stereo” must be selected. If “Downmix to Stereo” is deselected, the track is also deselected as primary audio.
Tip: You can choose which subtitles or closed captions file to see in the preview area by clicking ![]() . You can choose which audio to preview by clicking
. You can choose which audio to preview by clicking ![]() .
.
Configure an iTunes Store package
After you create an iTunes Store package and add media, you need to add identifying production data to the package.
In the Compressor batch area, click the top of the iTunes Store Package to reveal the iTunes Store Package inspector.
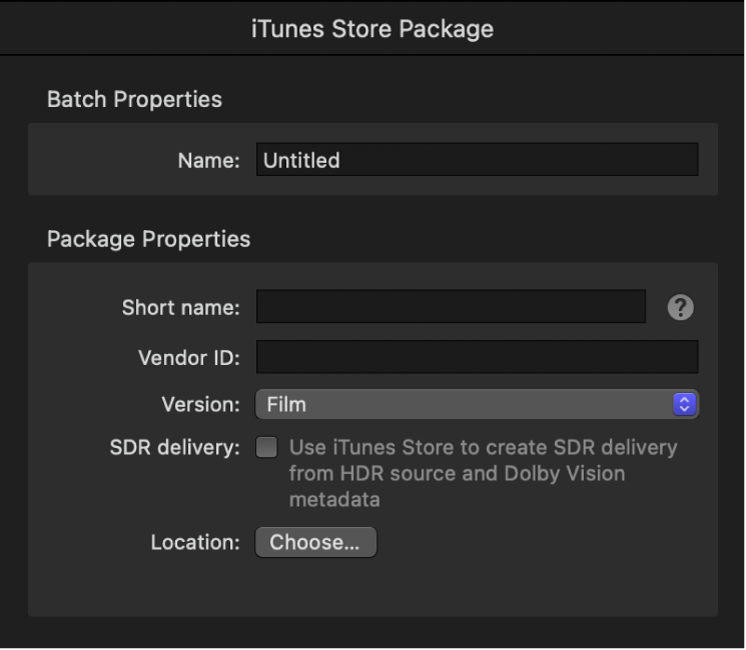
In the iTunes Store Package inspector, enter a name for the project in the Name field.
Note: This name will be used only to represent the job within Compressor.
In the Package Properties section of the inspector, enter a short name that corresponds to the party who will ultimately submit the package to the iTunes Store.
The short name is generated and supplied by the iTunes Store and is used for internal identification. If you do not have an account with an assigned short name, enter placeholder text here, and your delivery partner will add the correct information to the package before submitting it to the iTunes Store.
Enter a Vendor ID.
The Vendor ID is a unique identifier for the movie you are submitting to the iTunes Store. This ID is used for tracking your assets and sales reporting.
If you don’t know your vendor ID, you can enter any placeholder text here and your delivery partner will add a valid vendor ID to the package before submission to the iTunes Store.
Important: The vendor ID can contain only alphanumeric characters and underscore marks; it can’t contain spaces, dashes, ampersands, other punctuation, or symbols. The vendor identifier is case-sensitive and must not start with an underscore. If a vendor ID is numeric, it’s treated as a string, not numbers (for example, a vendor identifier of 000000000123456 is not the same as 123456). Vendor IDs must be at least six ASCII characters in length but not longer than 100 ASCII characters.
In the Version pop-up menu, if the package media is for a standalone video, choose “Film.” If the package is part of a subscription, choose “Subscription video.”
Select the “SDR delivery” checkbox if you want the iTunes Store to create an SDR version of the video from an HDR source and Dolby Vision metadata.
Click Choose, then select the location on your computer where you want to save the package.
Add chapter markers to the feature video
iTunes Store videos must include chapters so that viewers can jump directly to specific sections of the movie. If your source video file already has chapter markers, those will be used. If your source video file doesn’t have chapter markers, you can add them in Compressor.
In the Compressor batch area, select the feature filename or a preview video filename.
In the preview area, navigate to the frame where you want to begin the chapter.
Click the arrow next to the Marker button
 , then choose Add Marker.
In the Marker inspector, enter a name for the marker.
Click the Image pop-up menu, then choose Frame or File to assign a preview image associated with the chapter marker.
Important: Chapter markers must have an image associated with them (and not a black frame) to be compliant with iTunes Store submission requirements.
Repeat steps 2–5 to add additional chapter markers as required.
For more information about chapter markers, see Add markers in Compressor.
Build an iTunes Store package
After your package is properly loaded and configured, you can build the package.
In the Compressor batch area, click Start Batch.
Compressor transcodes all the files, combining them into a single package file.
Correct or augment an iTunes Store package
You can add or update components in a completed iTunes Store package using Compressor. For example, if you want to add another subtitle file to a completed package, you can append the new file to the package. As long as the data in the package properties matches that in the original package, Compressor automatically combines the items and ensures that the package is correctly configured and ready for uploading.
In Compressor, choose File > New iTunes Store Package.
An iTunes Store package is added to the batch area.
In the batch area, click the top of the iTunes Store Package to reveal the iTunes Store Package inspector.
In the iTunes Store Package inspector, enter a name, then set the package properties to precisely match the values in the package you want to augment or change.
In the batch area, add the new or modified subtitle files, closed-caption files, or alternate audio files.
Note: If you create a package with no feature video, the preview area displays a missing media warning. Because you’re deliberately generating a package without video, this is not an error, so you can ignore this warning.
In the iTunes Store Package inspector, click Choose, then select the same location where the original package was saved.
At the bottom of the batch area, click Start Batch.
The existing package is updated to include the new or changed elements from the new batch.
Note: You can’t remove elements from a package after it has been created. If you want to remove an element from an existing package, you must create a new package from scratch.
Compressor can’t directly submit a package to the iTunes Store; most content creators use a delivery partner to submit their iTunes Store package. For a list of approved delivery partners, see iTunes Store delivery partners.
Additionally, a complete iTunes Store package consists of both assets and metadata. Compressor generates a package without some essential metadata such as the title, synopsis, cast and crew lists, and so on. That data must be submitted via iTunes Connect by an authorized user (usually the delivery partner).
Download this guide: PDF