Mac Pro (Mid 2012 and earlier): How to remove or install memory
Learn how to remove memory from or install memory into your Mac Pro computer (Mid 2012 and Earlier). Note: There are different instructions for the Mac Pro (Late 2013).
Choose your model
From the Apple () menu, choose About This Mac.
Click More Info.
Select Hardware from the Contents list.
Find "Number of Processors" under Hardware Overview. The quad-core and 6-core Mac Pro have one CPU and the 8-core and 12-core Mac Pro have two CPUs.
2012 | |
2010 | |
2009 | |
2008 | |
Earlier |
Applicable models
Mac Pro (Mid 2012), Quad-core
Mac Pro (Mid 2012), 6-core
Mac Pro (Mid 2012), 12-core
Memory specifications
Mac Pro (Mid 2012) computers have these memory specifications:
Quad-core or 6-core | 8-core or 12-core | |
Number of processors | 1 | 2 |
Number of memory slots | 4 | 8 |
Base memory | 6 GB | 8 GB |
Maximum memory | 32 GB | 64 GB |
Memory card specifications | - PC3-10600E, 1333 MHz, DDR3 SDRAM UDIMMs and RDIMMs - Error-correcting code (ECC) - 72-bit wide, 240-pin ECC modules - 36 ICs maximum per ECC UDIMM | |
Additional notes | Important: Apple recommends that you use Apple-approved DIMMs. DIMMs from older Mac computers cannot be used in your Mac Pro. You can purchase Apple-branded memory online from the Apple Store. Note: Although the memory speed of the UDIMMS is 1333 MHz, they will operate at 1066 MHz or1333 MHz depending on the processor in the computer. 8GB RDIMMs are also supported. The computer will not start if both types of DIMMS are installed in the same computer. For more information, see Mac Pro (Mid 2010): Registered DIMM support. | |
Removing or installing memory
Step 1: Determine which Mac Pro you have
Choose Apple (), then About This Mac from the upper-left menu bar.
Click More Info.
Select Hardware from the Contents list.
Find Number Of Processors in Hardware Overview. The quad-core and 6-core Mac Pro have one CPU and 12-core Mac Pro have two CPUs.
Step 2: Remove the side panel
Before you open your Mac Pro, shut it down by choosing Shut Down from the Apple () menu.
Note: Always shut down your Mac Pro before opening it to avoid damaging its internal components or the components you want to install. Do not open your Mac Pro or attempt to install items inside it while it is on.
Wait 5 to 10 minutes to allow the internal components of your Mac Pro to cool.
Warning: Let your Mac Pro cool down before you touch the internal components, which may be very warm.
Touch the metal on the outside of your Mac Pro to discharge any static electricity.
Note: Always discharge static before you touch parts or install components inside your Mac Pro. To avoid generating static, don't move around the room until you finish installing the cards, memory, or internal storage device and replace the side panel.
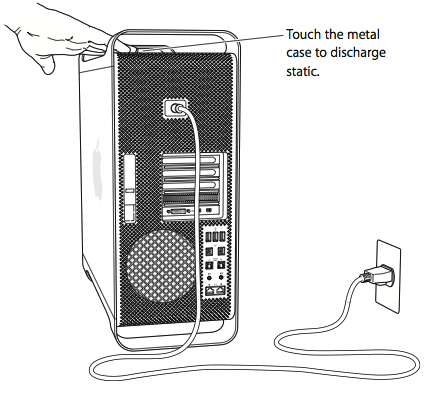
Unplug all the cables and the power cord from your Mac Pro.
Note: To avoid damaging internal components or the components you want to install, always unplug your Mac Pro. Don't attempt to install items while it's plugged in.
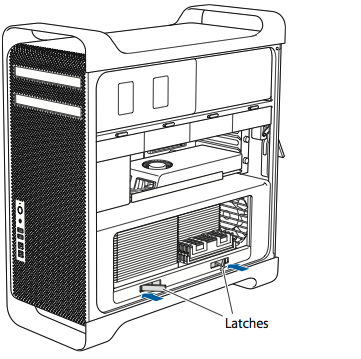
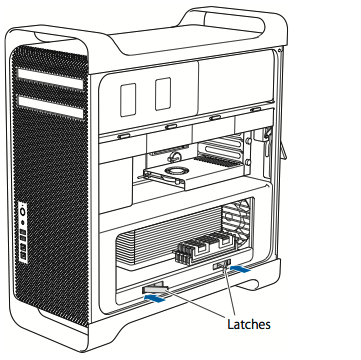
Hold the side panel and lift the latch on the back.
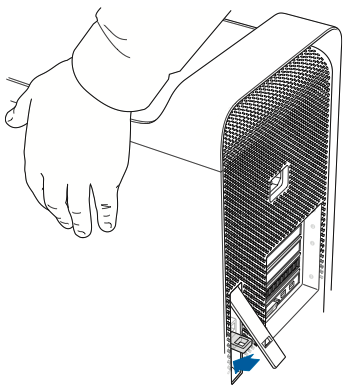
Remove the side panel by pulling the top away from your Mac Pro and lifting up.
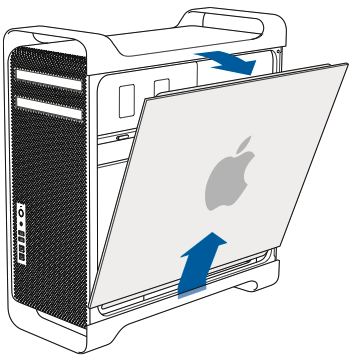
Important: Hold the side panel securely wile you remove it.
Step 3: Install the memory
In a Quad-Core or 6-Core Mac Pro (Mid 2012):
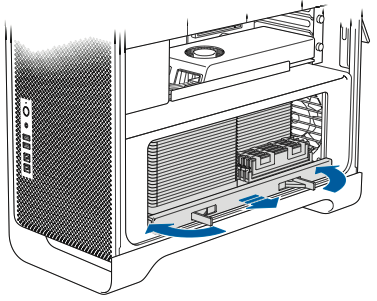
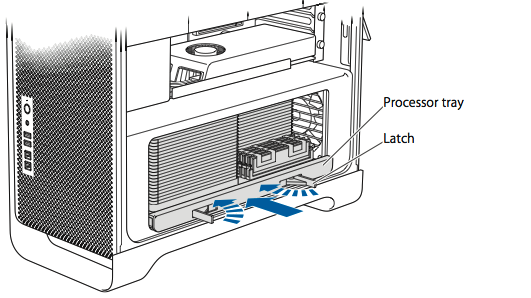
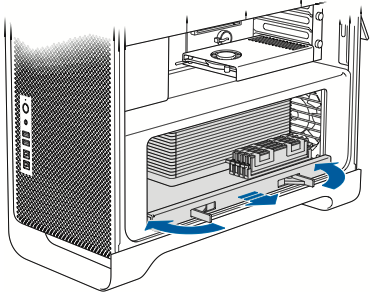
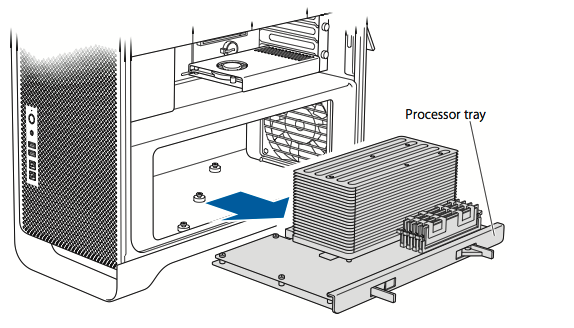
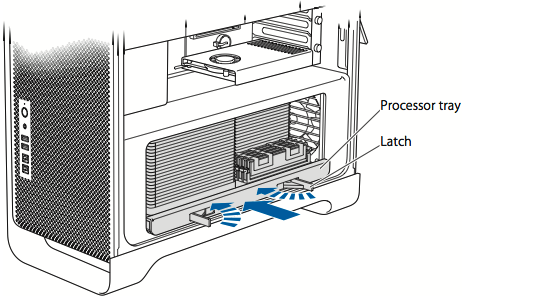
Push the latches on the processor tray until they partially open.
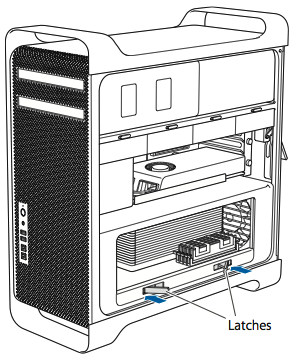
Pull the latches until they open all the way and release the processor tray.
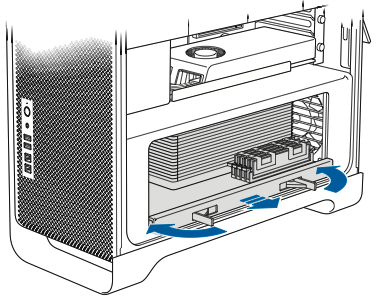
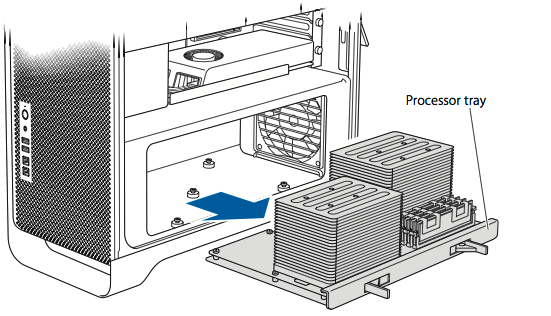
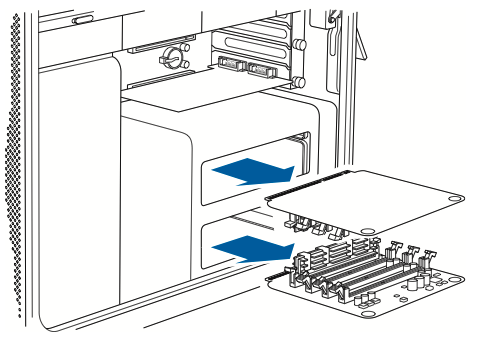
Remove the processor tray and lay it on a soft, clean cloth on the desk or work surface, to protect the tray and avoid scratching the work surface.

If you are installing equal-size DIMMs (all 2 GB or all 4 GB) in your Mac Pro, Apple recommends that you fill the slots in the order listed in the table
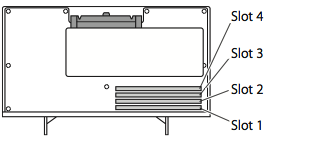
If you have
Fill these slots
Two DIMMs
1 and 2

Three DIMMs
1, 2, and 3

Four DIMMs
1, 2, 3, and 4 (all)

Note: If you install different sized DIMMs in your Mac Pro, follow the order in the table above. If the DIMM configuration you install doesn't provide optimized performance, the Memory Slot Utility should appear onscreen and recommend an improved configuration. To use the utility again, go to /System/Library/CoreServices/Memory Slot Utility.
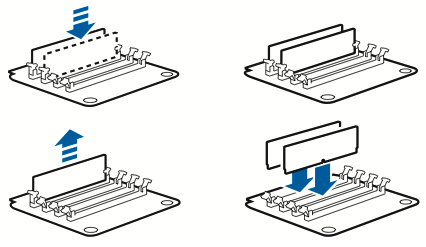
Open the ejectors on DIMM slots 1, 2, and 3 and push them out to the sides. Remove the DIMMs from the slots.
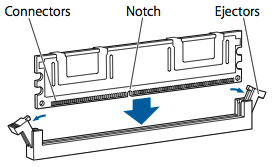
Install the DIMMs by aligning them in the DIMM slots and pushing both ends of the DIMM down until the tabs are vertical and the ejectors snap into place.
Note: To avoid damaging the DIMM, hold it by the corners and don't touch the gold connectors or other components.
Reinstall the processor tray, pushing it in until the latches are at a 45-degree angle.
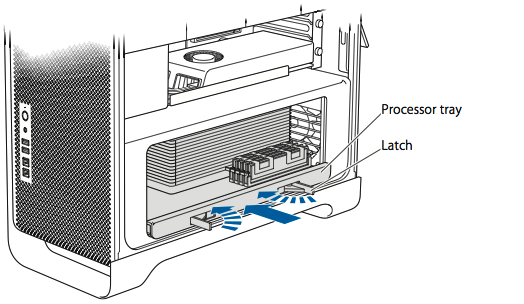
Push the latches all the way in to close them and seat the processor tray.
In a Quad-Core or 6-Core Mac Pro (Mid 2012):
Push the latches on the processor tray until they partially open.
Pull the latches until they open all the way and release the processor tray.
Remove the processor tray and lay it on a soft, clean cloth on the desk or work surface to protect the tray and avoid scratching the work surface.
If you install equal-size DIMMs (for example, all 2 or 4 GB DIMMs) in your Mac Pro, Apple recommends that you fill the slots in the order listed in the table.
If you have
Fill these slots
Fill these slots
Two DIMMs
1 and 2

Three DIMMs
1, 2 and 3

Four DIMMs
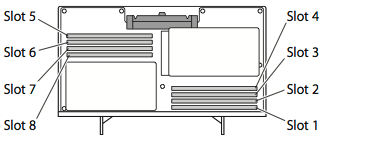
1, 2, 5 and 6

Six DIMMs
1, 2, 3 and 5, 6, 7

Eight DIMMs
1, 2, 3, 4 and 5, 6, 7, 8 (all)

Note: If you install different-size DIMMs in your Mac Pro, follow the order in the table. If the DIMM configuration you install doesn't provide optimized performance, the Memory Slot Utility appears onscreen and recommends an improved configuration.
To use the utility again, go to /System/Library/CoreServices/Memory Slot Utility.
Install the DIMMs by aligning them in the DIMM slots and pushing both ends of the DIMM down until the tabs are vertical and the ejectors snap into place.
Note: To avoid damaging the DIMM, hold it by the corners and don't touch the gold connectors or other components.
Reinstall the processor tray, pushing it in until the latches are at a 45-degree angle.
Push the latches all the way in to close them and seat the processor tray.
Step 4: Replace the side panel
Note: Always replace the side panel after installing components. Your Mac Pro won't operate properly without the side panel in place.
Important: When you replace the side panel, make sure the latch is up. Hold the side panel securely so it stays in place as you push the latch down.
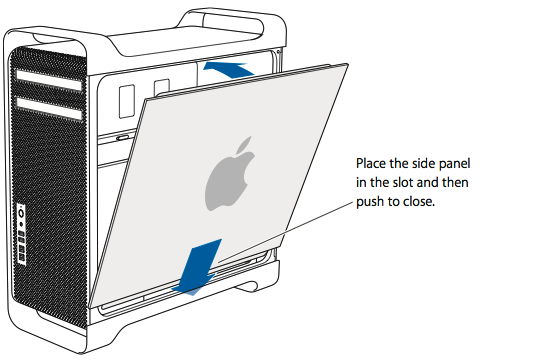
Hold the side panel against your Mac Pro and push the latch down to secure the side panel.
You can attach a lock or cable through the metal loop to secure your Mac Pro. Flip the lock tab down before you close the latch.
Note: Always replace the side panel after installing components. Your Mac Pro won't operate properly without the side panel in place.
Important: When you replace the side panel, make sure the latch is up. Hold the side panel securely so it stays in place as you push the latch down.
Hold the side panel against your Mac Pro and push the latch down to secure the side panel.
You can attach a lock or cable through the metal loop to secure your Mac Pro. Flip the lock tab down before you close the latch.
Applicable models
Mac Pro (Mid 2010), Quad-core
Mac Pro (Mid 2010), 6-core
Mac Pro (Mid 2010), 8-core
Mac Pro (Mid 2010), 12-core
Memory specifications
The Mac Pro (Mid 2010) computers have these memory specifications:
Quad-core or 6-core | 8-core or 12-core | |
Number of processors | 1 | 2 |
Number of memory slots | 4 | 8 |
Base memory | 3 GB | 6 GB |
Maximum memory | 32 GB | 64 GB |
Memory card specifications | - PC3-10600E, 1333 MHz, DDR3 SDRAM UDIMMs and RDIMMs - Error-correcting code (ECC) - 72-bit wide, 240-pin ECC modules - 36 ICs maximum per ECC UDIMM | |
Additional notes | Important: Apple recommends that you use Apple-approved DIMMs. DIMMs from older Mac computers cannot be used in your Mac Pro. You can purchase Apple-branded memory online from the Apple Store. Note: Although the memory speed of the UDIMMS is 1333 MHz, they will operate at 1066 MHz or 1333 MHz depending on the processor in the computer. 8GB RDIMMs are also supported. The computer will not start if both types of DIMMS are installed in the same computer. For more information, see Mac Pro (Mid 2010): Registered DIMM support. | |
Removing or installing memory
Step 1: Determine which Mac Pro you have
Choose Apple (), then About This Mac from the upper-left menu bar.
Click More Info.
Select Hardware from the Contents list.
Find Number Of Processors in Hardware Overview. The quad-core and 6-core Mac Pro have one CPU and the 8-core and 12-core Mac Pro have two CPUs.
Step 2: Remove the side panel
Before you open your Mac Pro, shut it down by choosing Apple (), then Shut Down.
Note: Always shut down your Mac Pro before opening it to avoid damaging its internal components or the components you want to install. Do not open your Mac Pro or attempt to install items inside it while it is on.
Wait 5 to 10 minutes to allow the internal components of your Mac Pro to cool.
Warning: Let your Mac Pro cool down before you touch the internal components, which may be very warm.
Touch the metal on the outside of your Mac Pro to discharge any static electricity.
Note: Always discharge static before you touch parts or install components inside your Mac Pro. To avoid generating static, don't move around the room until you finish installing the cards, memory, or internal storage device and replace the side panel.
Unplug all the cables and the power cord from your Mac Pro.
Note: To avoid damaging internal components or the components you want to install, always unplug your Mac Pro. Don't attempt to install items while it's plugged in.
Hold the side panel and lift the latch on the back.
Remove the side panel by pulling the top away from your Mac Pro and lifting up.
Important: Hold the side panel securely wile you remove it.
Step 3: Install the memory
In a Quad-Core or 6-Core Mac Pro (Mid 2010)
Push the latches on the processor tray until they partially open.
Pull the latches until they open all the way and release the processor tray.
Remove the processor tray and lay it on a soft, clean cloth on the desk or work surface, to protect the tray and avoid scratching the work surface.
If you are installing equal-size DIMMs (all 1 GB or all 2 GB) in your Mac Pro, Apple recommends that you fill the slots in the order listed in the table.
If you have
Fill these slots
Two DIMMs
1 and 2
Three DIMMs
1, 2, and 3
Four DIMMs
1, 2, 3, and 4 (all)
Note: If you install different sized DIMMs in your Mac Pro, follow the order in the table above. If the DIMM configuration you install doesn't provide optimized performance, the Memory Slot Utility should appear onscreen and recommend an improved configuration. To use the utility again, go to /System/Library/CoreServices/Memory Slot Utility.
Open the ejectors on DIMM slots 1, 2, and 3 and push them out to the sides. Remove the DIMMs from the slots.
Install the DIMMs by aligning them in the DIMM slots and pushing both ends of the DIMM down until the tabs are vertical and the ejectors snap into place.
Note: To avoid damaging the DIMM, hold it by the corners and don't touch the gold connectors or other components.
Reinstall the processor tray, pushing it in until the latches are at a 45-degree angle.
Push the latches all the way in to close them and seat the processor tray.
In an 8-Core or 12-Core Mac Pro (Mid 2010)
Push the latches on the processor tray until they partially open.
Pull the latches until they open all the way and release the processor tray.
Remove the processor tray and lay it on a soft, clean cloth on the desk or work surface to protect the tray and avoid scratching the work surface.
If you install equal-size DIMMs (for example, all 1 or 2 GB DIMMs) in your Mac Pro, Apple recommends that you fill the slots in the order listed in the table.
If you have
Fill these slots
Fill these slots
Two DIMMs
1 and 2
Three DIMMs
1, 2, and 3
Four DIMMs
1, 2, 5, and 6
Six DIMMs
1, 2, 3 and 5, 6, 7
Eight DIMMs
1, 2, 3, 4, and 5, 6, 7, 8 (all)
To use the utility again, go to /System/Library/CoreServices/Memory Slot Utility.
Install the DIMMs by aligning them in the DIMM slots and pushing both ends of the DIMM down until the tabs are vertical and the ejectors snap into place.
Note: To avoid damaging the DIMM, hold it by the corners and don't touch the gold connectors or other components.
Reinstall the processor tray, pushing it in until the latches are at a 45-degree angle.
Push the latches all the way in to close them and seat the processor tray.
Step 4: Replace the side panel
Note: Always replace the side panel after installing components. Your Mac Pro won't operate properly without the side panel in place.
Important: When you replace the side panel, make sure the latch is up. Hold the side panel securely so it stays in place as you push the latch down.
Hold the side panel against your Mac Pro and push the latch down to secure the side panel.
You can attach a lock or cable through the metal loop to secure your Mac Pro. Flip the lock tab down before you close the latch.
Applicable models
Mac Pro (Early 2009), Quad-core
Mac Pro (Early 2009), 8-core
Memory specifications
The Mac Pro (Early 2009) computers have these memory specifications:
Quad-core | 8-core | |
Number of processors | 1 | 2 |
Number of memory slots | 4 | 8 |
Base memory | 3 GB | 6 GB |
Maximum memory | 16 GB | 32 GB |
Memory card specifications | - PC3-8500, 1066 MHz, DDR3 SDRAM UDIMMs - Error-correcting code (ECC) - 72-bit wide, 240-pin ECC modules -36 ICs maximum per ECC UDIMM | |
Removing or installing memory
Step 1: Determine which Mac Pro you have
Choose Apple (), then About This Mac from the upper-left menu bar.
Click More Info.
Select Hardware from the Contents list.
Find Number Of Processors in Hardware Overview. The quad-core and 6-core Mac Pro have one CPU and the 8-core Mac Pro has two CPUs.
Step 2: Remove the side panel
Before you open your Mac Pro, shut it down by choosing Apple (), then Shut Down.
Note: Always shut down your Mac Pro before opening it to avoid damaging its internal components or the components you want to install. Do not open your Mac Pro or attempt to install items inside it while it is on.
Wait 5 to 10 minutes to allow the internal components of your Mac Pro to cool.
Warning: Let your Mac Pro cool down before you touch the internal components, which may be very warm.
Touch the metal on the outside of your Mac Pro to discharge any static electricity.
Note: Always discharge static before you touch parts or install components inside your Mac Pro. To avoid generating static, don't move around the room until you finish installing the cards, memory, or internal storage device and replace the side panel.
Unplug all the cables and the power cord from your Mac Pro.
Note: To avoid damaging internal components or the components you want to install, always unplug your Mac Pro. Don't attempt to install items while it's plugged in.
Hold the side panel and lift the latch on the back.
Remove the side panel by pulling the top away from your Mac Pro and lifting up.
Important: Hold the side panel securely wile you remove it.
Step 3: Install the memory
In a Quad-Core Mac Pro (Early 2009)
Push the latches on the processor tray until they partially open.
Pull the latches until they open all the way and release the processor tray.
Remove the processor tray and lay it on a soft, clean cloth on the desk or work surface, to protect the tray and avoid scratching the work surface.
If you are installing equal-size DIMMs (all 1 GB or all 2 GB) in your Mac Pro, Apple recommends that you fill the slots in the order listed in the table.
If you have
Fill these slots
Two DIMMs
1 and 2
Three DIMMs
1, 2, and 3
Four DIMMs
All (1, 2, 3, and 4)
Note: If you install different sized DIMMs in your Mac Pro, follow the order in the table. If the DIMM configuration you install doesn't provide optimized performance, the Memory Slot Utility should appear onscreen and recommend an improved configuration. To use the utility again, go to /System/Library/CoreServices/Memory Slot Utility.
Open the ejectors on DIMM slots 1, 2, and 3 and push them out to the sides. Remove the DIMMs from the slots.
Install the DIMMs by aligning them in the DIMM slots and pushing both ends of the DIMM down until the tabs are vertical and the ejectors snap into place.
Note: To avoid damaging the DIMM, hold it by the corners and don't touch the gold connectors or other components.
Reinstall the processor tray, pushing it in until the latches are at a 45-degree angle.
Push the latches all the way in to close them and seat the processor tray.
In an 8-Core Mac Pro (Early 2009)
Push the latches on the processor tray until they partially open.
Pull the latches until they open all the way and release the processor tray.
Remove the processor tray and lay it on a soft, clean cloth on the desk or work surface to protect the tray and avoid scratching the work surface.
If you install equal-size DIMMs (all 1, 2, or 4 GB) in your Mac Pro, Apple recommends that you fill the slots in the order listed in the table.
If you have
Fill these slots
Fill these slots
Two DIMMs
1 and 2
Three DIMMs
1, 2, and 3
Four DIMMs
1, 2, 5, and 6
Six DIMMs
1, 2, 3 and 5, 6, 7
Eight DIMMs
1, 2, 3, 4, and 5, 6, 7, 8 (all)
Note: If you install different-size DIMMs in your Mac Pro, follow the order in the table. If the DIMM configuration you install doesn't provide optimized performance, the Memory Slot Utility should appear onscreen and recommend an improved configuration.
To use the utility again, go to /System/Library/CoreServices/Memory Slot Utility.
Install the DIMMs by aligning them in the DIMM slots and pushing both ends of the DIMM down until the tabs are vertical and the ejectors snap into place.
Note: To avoid damaging the DIMM, hold it by the corners and don't touch the gold connectors or other components.
Reinstall the processor tray, pushing it in until the latches are at a 45-degree angle.
Push the latches all the way in to close them and seat the processor tray.
Step 4: Replace the side panel
Note: Always replace the side panel after installing components. Your Mac Pro doesn't operate properly without the side panel in place.
Important: When you replace the side panel, make sure the latch is up. Hold the side panel securely so it stays in place as you push the latch down.
Hold the side panel against your Mac Pro and push the latch down to secure the side panel.
You can attach a lock or cable through the metal loop to secure your Mac Pro. Flip the lock tab down before you close the latch.
Applicable models
Mac Pro (Early 2008)
Mac Pro (8-core)
Mac Pro (Original)
Memory specifications
This Mac Pro model has these memory specifications:
Number of memory slots | 2 memory cards with 4 memory slots on each card (4 banks of 2 each) |
Base memory | 2 GB (Two 1 GB fully buffered dual inline memory modules,FB-DIMMs) |
Maximum memory | 32 GB |
Memory card specifications | - 800 MHz, DDR2, FB-DIMMs - 72-bit wide, 240-pin modules - 36 memory ICs maximum per DIMM - Error-correcting code (ECC) |
Additional notes | Important: Apple recommends that you use Apple-approved FB-DIMMs. Other FB-DIMMs may cause your Mac Pro to operate louder or decrease performance to conserve heat. DIMMs from older Mac computers cannot be used in your Mac Pro. |
You should install FB-DIMMs in matched pairs of equal size and equal specification. Use the table below and the instructions that follow as guidelines for DIMM placement.
If you have | Install |
Two DIMMs (standard configuration) | One on the top memory card and one on the bottom card |
Four DIMMs | One pair on the top memory card and one pair on the bottom card |
Six DIMMs | Two pairs on the top memory card and one pair on the bottom card |
Eight DIMMs | Two pairs on the top memory card and two pairs on the bottom card |
Removing or installing memory
Warning: Let your Mac Pro cool down for 5 to 10 minutes before you touch the internal components. The components on the memory cards may be very warm.
Step 1: Remove the side panel
Shut down your Mac Pro.
Note: Always shut down your Mac Pro before opening it to avoid damaging its internal components or the components you want to install. Do not open your Mac Pro or attempt to install items inside it while it is on.
Wait 5 to 10 minutes to allow the internal components of your Mac Pro to cool.
Warning: Let your Mac Pro cool down before you touch the internal components, which may be very warm.
Touch the metal on the outside of your Mac Pro to discharge any static electricity.
Important: Always discharge static before you touch parts or install components inside your Mac Pro. To avoid generating static, do not move around the room until you finish installing the cards, memory, or internal storage device and replace the side panel.
Unplug all the cables and the power cord from your Mac Pro.
Note: To avoid damaging internal components or the components you want to install, always unplug your Mac Pro. Don't attempt to install items while it's plugged in.
Hold the side panel and lift the latch on the back.
Remove the side panel by pulling the top away from your Mac Pro and lifting up.
Important: Hold the side panel securely wile you remove it.
Step 2: Install or remove the memory cards
Using the two finger holes, pull on the memory cards to remove them, then place them on a soft, clean cloth with the DIMMs facing up.
On the bottom memory card, open the ejectors on the DIMM slot and push them out to the sides, and then remove the DIMM from slot 1.
Important: When installing or removing DIMMs, don't touch the gold connectors on the DIMMs or the memory cards.
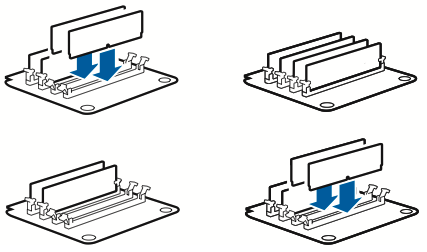
Reinstall the DIMM you removed on the top memory card by aligning it in DIMM slot 2, as shown in the illustration, and pushing both ends of the DIMM down until the tabs are vertical and the ejectors snap into place.
Install the first pair of additional DIMMs on the bottom memory card in DIMM slots 1 and 2, the slots closest to the card's gold connectors.
Important: Always install DIMMs as matched pairs and in the order shown below.
Move one DIMM from bottom card to top card
First pair of additional DIMMs
Top memory card
Bottom memory card
If you add a second pair of additional DIMMs, install them on the top memory card in DIMM slots 3 and 4, the last two slots.
Second pair of additional DIMMs
Third pair of additional DIMMs
Top memory card
Bottom memory card
If you add a third pair of additional DIMMs, install them on the bottom memory card in DIMM slots 3 and 4.
Lay your Mac Pro down on a soft, clean cloth on the desk or work surface to avoid scratching the work surface or your Mac Pro.
Reinstall each memory card, pushing it straight down until it's seated in the memory slot.

Step 3: Replace the side panel
Stand your Mac Pro up and replace the side panel.
Important: When you replace the side panel, make sure the latch is up. Hold the side panel securely so it stays in place as you push the latch down.
Hold the side panel against your Mac Pro and push the latch down to secure the side panel.
You can attach a lock or cable through the metal loop to secure your Mac Pro. Flip the lock tab down before you close the latch.
Learn more
Checking that your computer recognizes the new memory
Press the power button to turn on your Mac Pro.
When the Mac OS desktop appears, choose Apple (), then About This Mac and check that the reported amount of memory is correct.
If the reported memory size isn't correct, the computer may be having issues recognizing a memory module. If this happens, shut down your Mac Pro, verify the module specifications against the requirements listed above, and repeat the memory installation instructions to make sure the modules are installed correctly. If you still have issues, remove the memory and consult the support information that came with the memory, or contact the vendor who provided the memory.
Purchasing memory
When purchasing DIMMs for use in Mac computers, make sure that the memory vendor conforms to the Joint Electron Device Engineering Council (JEDEC) specification. Check with your memory vendor to ensure that the DIMMs support the correct timing modes and that the Serial Presence Detect (SPD) feature has been programmed properly, as described in the JEDEC specification.