Xsan 2, Promise VTrak RAID: Configuring for use in a video editing environment
You can choose to deploy Xsan 2.0 or later with a single Promise VTrak RAID Controller with the intention of later expanding your storage to include VTrak Expansion Chassis and/or additional RAID controllers.
Follow these steps to ensure that the Promise VTrak and Xsan are configured for optimal performance, and for ease of adding storage.
Configuring the Promise VTrak RAID controller
This article contains a configuration script that will configure a Promise VTrak RAID Controller’s 16 drives to act as three RAID arrays: One RAID array for use as Xsan Metadata storage, and two additional RAID arrays to be used as Xsan data storage. Import the script following the instructions here.
After the Promise VTrak RAID Controller has been configured, one may configure an Xsan Volume which will be composed of the three RAID Arrays configured in the previous step.
Configuring an Xsan Volume
Install Xsan per the instructions in in the Xsan 2 Administrator’s Guide.
During the SAN Setup, you will be prompted to create an Xsan Volume, or, if you have completed the setup, in order to create a new volume, in Xsan Admin, choose Volumes and then click the "+" button.
The first pane of the SAN Setup volume configuration interface is titled "Volume Name and Type". Here, set the volume name and select the volume type preset that best matches the type of video your site will capture, edit and print-- "Uncompressed High Definition Video" or "Standard Definition Video".
Click "Continue".
The next pane is titled "Label LUNs". LUN labels are the names that will be assigned to the RAID Arrays you’ve configured. Choose to either manually apply these names, or choose to automatically label the arrays with a prefix of your choice.
Click Continue until the pane titled "Configure Volume Affinities".
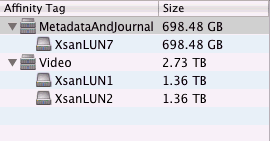
Three LUNs should appear in LUN Label column. Drag and drop the smallest of the three LUNs to the Affinity Tag titled "MetadataAndJournal". Drag and drop the two remaining LUNs to the Affinity Tag "Video".
Select and delete any unpopulated Affinity Tags.
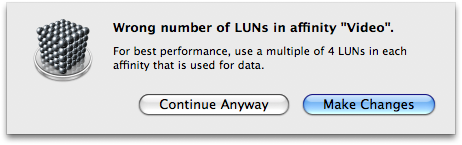
Click Continue. The following sheet will appear if you have provided a less than optimal amount of LUNs to a given Affinity Tag. In order to achieve optimal performance, both the "Uncompressed High Definition Video" volume preset and the "Standard Definition Video" volume preset expect four LUNs to exist in each Affinity Tag. For the purposes of this deployment, select "Continue Anyway".
At this point, Xsan Admin has created a Storage Pool called Video, to which video files should be written. Follow these steps to create an Affinity Folder which will be associated with the Video Affinity Tag. Data written to this folder will be stored only on Storage Pools that belong to the Video Affinity Tag.
In Xsan Admin, choose "File Management" and select your Xsan Volume. Select a directory which will act as the Affinity Folder or click the Action button (the gear button) and then "New Folder...".
Set the name of the folder.
Choose "Video" from the Affinity pop-up menu.
Click Create.
From this point forward, video files and other files that require high bandwidth access should be written to the Affinity Folder. This completes the configuration of the Promise VTrak RAID Controller and Xsan.
Adding a Promise VTrak Expansion Chassis
Later, if you introduce a SAS-connected VTrak Expansion Chassis to the RAID controller, follow these steps to ensure the storage and the Xsan volume are configured for optimal performance.
Configuring the Promise VTrak Expansion Chassis
This article contains a configuration script that will configure your new Promise VTrak Expansion Chassis’ 16 drives to act as three RAID 5 arrays to be used as Xsan data storage. (Two Six-drive RAID5 arrays for use as video storage, and a single three-drive RAID5 array for use as audio or scratch storage)
Import the script using the instructions provided in this article.
Note: The script is designed to protect existing data, but you should back up all data before proceeding. Only apply this script if you have previously configured a single VTrak RAID controller using the steps provided earlier in this article.
Once the Promise VTrak Expansion Chassis has been configured, you may incorporate the new arrays into the Xsan Volume.
Expanding the Xsan Volume
These steps let you add two new RAID Arrays to your pre-existing Affinity Tag, expanding it in order to have the optimal amount of LUNs in the Affinity Tag.
In Xsan Admin, choose ‘Volumes’ and select your Xsan volume. Click the Action button (the gear button) and then "Expand Volume..."
The Expand Volume assistant will appear. If you have not labeled your new RAID Arrays, the first pane you’ll be presented with is titled "Label LUNs". Choose to either manually apply these names, or choose to automatically label the arrays with a prefix of your choice.
Click Continue until you reach the pane titled "Configure Volume Affinities".
Drag and drop two new larger LUNs to the Video Affinity Tag.
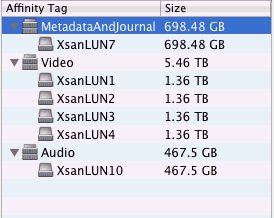
Optional: Click the New Affinity Tag button and create a new Affinity Tag to be used as Audio or Scratch storage. Drag and drop the smaller new LUN to the newly created Audio/Scratch Affinity Tag.
Click Continue.
If you created a new Audio/Scratch Affinity Tag, follow these additional steps:
In Xsan Admin, choose "File Management" and select your Xsan Volume. Select a directory which will act as the Affinity Folder or click the Action button (the gear button) and then "New Folder...".
Set the name of the folder.
Choose "Audio/Scratch" from the Affinity pop-up menu.
Click Create.
From this point forward, audio and scratch files and other files that do not require high bandwidth access should be written to the Audio/Scratch Affinity Folder.
Files that were saved to the Video Affinity Folder before the expanding of the Video Affinity Tag, will have only been written to two LUNs. Therefore, the performance benefits one expects from expanding the Affinity Tag will not apply to files that preexisted the expansion. If these files need to be delivered more quickly, they may be copied off the Xsan volume, deleted from the Xsan volume, then copied back to the Video Affinity Folder, which will result in the file being written across all four LUNs in the Video Affinity Tag. Alternately, one may destroy the Xsan volume and rebuild it when additional storage will be introduced to the deployment.
This completes the addition of an Expansion Chassis to a preexisting single RAID controller Xsan volume.
Adding additional Promise VTrak RAIDs
Later, when you introduce additional RAID Controllers and Expansion Chassis, follow these steps to ensure the storage and the Xsan volume are configured for optimal performance.
Configuring the Promise VTrak RAIDs
The following articles contain configuration scripts which will do the following:
This script will configure a single Promise VTrak RAID Controller’s 16 drives to act as three RAID5 arrays to be used as Xsan data storage.
This script will configure a single Promise VTrak RAID Controller’s and Expansion Chassis’ 32 drives to act as six RAID5 arrays to be used as Xsan data storage.
Each script is designed to protect existing data, but one should back up all data before proceeding. Only apply a script if you have previously configured a single VTrak RAID Controller using the steps provided earlier in this article.
Once the Promise VTrak Expansion Chassis has been configured, one may incorporate the new arrays into the Xsan Volume.
Expanding the Xsan Volume
Here, you will add new RAID Arrays to your pre-existing Affinity Tag, expanding it to contain more than 4 LUNs, which will automatically result in the creation of new Storage Pools that belong to the Video affinity.
In Xsan Admin, choose ‘Volumes’ and select your Xsan volume. Click the Action button (the gear button) and select "Expand Volume..."
The Expand Volume assistant will appear. If you have not labeled your new RAID Arrays, the first pane you’ll be presented with is titled "Label LUNs". Choose to either manually apply these names, or choose to automatically label the arrays with a prefix of your choice.
Click Continue until one reaches the pane titled "Configure Volume Affinities".
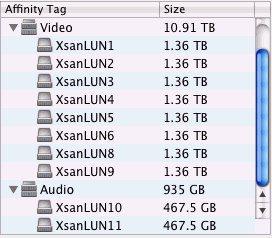
Drag and drop four new LUNs to the preexisting Affinity Tags, which will result in more than 4 LUNs existing in the Video Affinity Tag.
Note: Multiples of four LUNs should be added to the Affinity Tag at each expansion and these LUNs should be of equal size.
Click Continue.
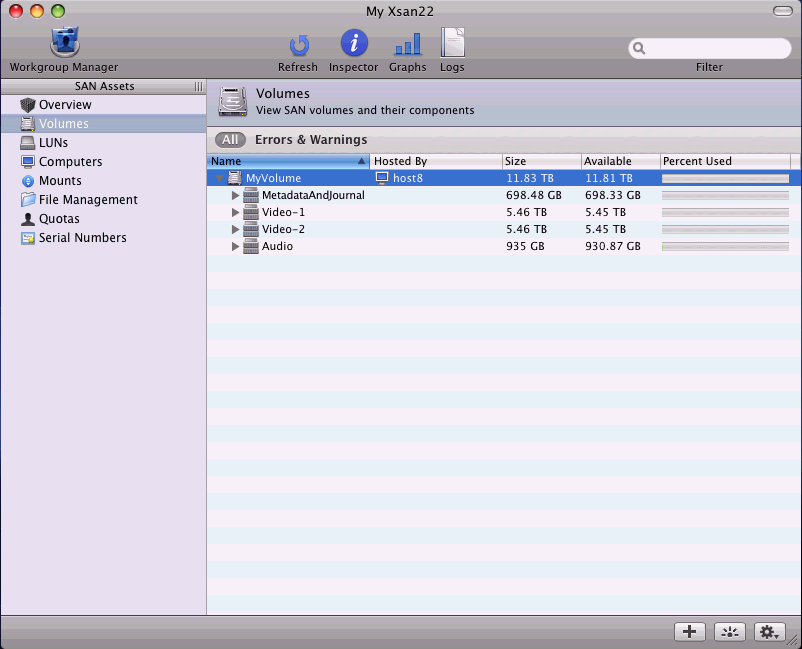
Xsan Admin creates new Storage Pools to accommodate the new storage. For every 4 LUNs introduced to the Video Affinity, a new Storage Pool will be created. These new Storage Pools are titled Video -2, Video-3, and so forth. Each of these automatically created Storage Pools belong to the Video Affinity.
This completes the addition of an Expansion Chassis to a pre-existing single RAID controller Xsan volume.
Information about products not manufactured by Apple, or independent websites not controlled or tested by Apple, is provided without recommendation or endorsement. Apple assumes no responsibility with regard to the selection, performance, or use of third-party websites or products. Apple makes no representations regarding third-party website accuracy or reliability. Contact the vendor for additional information.